Part I – Common Tasks
Payments – Recording Dues or Contributions
Step 1
To begin, choose “Payments” from the sidebar menu.
If you have not integrated your League’s PayPal account with your database yet, skip to Step 4 (entering manual payments).

Step 2
All of the UNPOSTED payments that members and/or donors have made will display. Before you post a payment:
If payment type says “Check” then wait until you receive and deposit the physical check before posting payment to that member’s profile.
If payment type says “PayPal” then the person paid by credit card. As long as there are no errors (red text), you can post the payment now.


If you see a red error message in the “Payment Info” column, you may need to contact the individual or check your PayPal account to determine the issue. If you need assistance, contact our Database Coordinator.
Step 3
Process payments one by one to confirm accuracy. To process a payment:
Right-click on the member’s name (it will show as a blue link) and open their profile in a new tab. This is so you can easily go to their profile after posting payment.
In the list of payments, click the “Post” box under the “Status” column.
Click the “Process Selected Payments” button at the top or bottom of the page.
Go to the new tab you just created with the member’s profile and refresh the page to see the posted payment. It will show under the “Contribution History” on the right side of the profile.


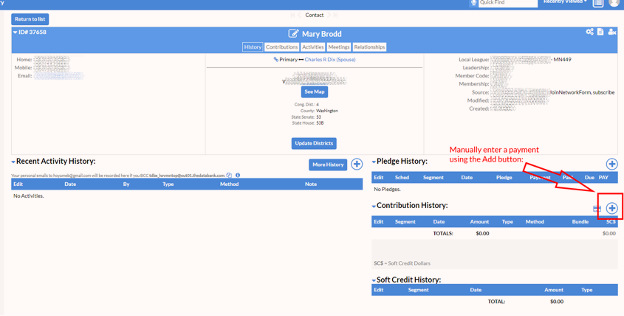
Step 4
If an individual makes a payment by mail or in person (or via PayPal that hasn’t yet been integrated with your database), you can record the transaction manually. Click on the blue plus sign in the “Contribution History” section of the member’s profile to start.
Step 5
Complete the following suggested fields:
Campaign (most often this will be your Membership dues)
Segment Code
Date (it may auto-fill, but you can change it if needed)
Amount $
Payment Method
Check Number (if applicable)
Contribution Note (if desired)
If you plan to use the receipt/thank you letter feature of the database, you can also enter the Date Thanked before or after generating that.
